
Imagine the aroma of freshly baked bread filling your home—a complex, tangy scent that speaks of ancient traditions and patient craftsmanship. This is the magic of sourdough, the world’s original leavened bread dating back to 3700 BCE. Unlike modern breads made with commercial yeast, sourdough is a living ecosystem of wild yeasts and beneficial bacteria that transform simple flour and water into something extraordinary.
What makes this sourdough recipe special is its balance of authenticity and accessibility. We’ll guide you through creating and maintaining your own sourdough starter—the heart of authentic sourdough baking—then use it to create beautiful, crusty loaves with the characteristic open crumb and complex flavor profile that makes sourdough so irresistible. The long fermentation process not only develops incredible flavor but also makes the bread more digestible and nutritious.
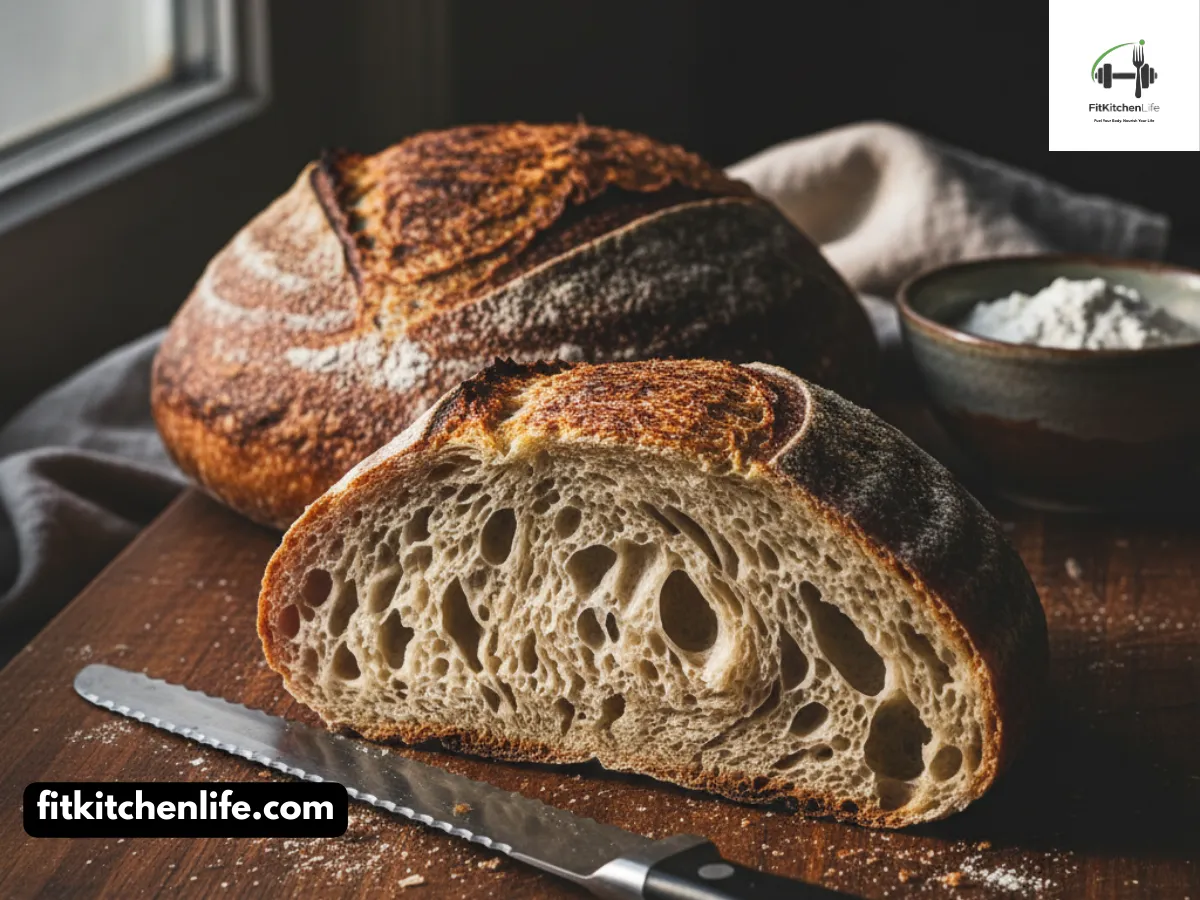
Picture breaking into a golden-brown crust to reveal the creamy, hole-filled interior, the result of careful fermentation and skilled handling. This isn’t just bread—it’s a connection to thousands of years of baking history, a testament to the power of natural fermentation, and a rewarding craft that yields results far superior to anything you’ll find in a supermarket.
Whether you’re a complete beginner or an experienced baker looking to perfect your sourdough technique, this recipe will guide you through each step with clear instructions, scientific explanations, and professional tips that will help you achieve bakery-quality results in your own kitchen.
Table of Contents
ToggleIngredients
For Creating Your Sourdough Starter (Days 1-7)
- 50g strong white bread flour (approximately ⅓ cup), for each daily feeding
- 50g lukewarm water (approximately 3 tablespoons + 1 teaspoon), for each daily feeding
For the Levain (Built 8 hours before baking)
- 1 tablespoon (15g) active sourdough starter
- 100g strong white bread flour (approximately ¾ cup)
- 100g lukewarm water (approximately ⅓ cup + 2 tablespoons)
For the Final Dough
- 1kg strong white bread flour (approximately 8 cups), plus extra for dusting
- 600g lukewarm water (approximately 2½ cups)
- 20g fine sea salt (approximately 1 tablespoon + 1 teaspoon)
- All of the levain (from above)
Yield: 2 large loaves (approximately 900g each) Serving Size: 1 slice (approximately 50g) Servings: 30-36 slices total
Ingredient Notes & Substitutions
- Flour Selection: Strong white bread flour (12-14% protein) is essential for developing the gluten structure needed for sourdough’s characteristic open crumb. For a more rustic loaf, substitute up to 30% with whole wheat or rye flour, but expect a denser crumb and more sour flavor.
- Water: Use filtered or spring water if possible. Chlorinated tap water can inhibit the growth of wild yeasts and beneficial bacteria in your starter.
- Salt: Fine sea salt dissolves more evenly than coarse salt. The salt controls fermentation rate and strengthens gluten structure.
- Starter Substitution: If you don’t want to create your own starter, you can purchase one from a reputable sourdough supplier or get some from a friend who bakes sourdough regularly.
Cost Estimate: $3-5 for all ingredients, making each large loaf approximately $1.50-2.50.
Instructions/Steps
Creating Your Sourdough Starter (Days 1-7)
-
Day 1 – Begin the starter: In a clean glass jar or plastic container, mix 50g flour with 50g lukewarm water until no dry flour remains. Cover loosely with a lid or cloth and leave at room temperature (20-22°C/68-72°F) for 24 hours.
Pro Tip: Use a container that’s at least twice the volume of your starter, as it will expand significantly as it becomes active.
-
Day 2 – First feeding: Discard all but 50g of the mixture (this is important to prevent over-acidification). Add 50g fresh flour and 50g lukewarm water. Stir until well combined, cover loosely, and leave for another 24 hours.
-
Day 3 – Second feeding: Repeat the process: discard all but 50g, then feed with 50g flour and 50g water. Cover and wait 24 hours. You may start to see small bubbles forming.
-
Day 4 – Third feeding: By now, you should see more activity with bubbles and a slightly sour aroma. Discard all but 50g, then feed with 50g flour and 50g water. Cover and wait 24 hours.
-
Day 5 – Fourth feeding: Your starter should be quite active now, with visible bubbles and a pleasant yeasty-sour smell. Discard all but 50g, then feed with 50g flour and 50g water. Cover and wait 24 hours.
-
Day 6 – Fifth feeding: The starter should be very active now. Test its readiness by dropping a small amount into a glass of water—if it floats, it’s ready to use. If not, continue feeding daily until it passes the float test.
-
Day 7 – Maintenance: Once your starter is active, you can store it in the refrigerator and feed it once a week. To use it, remove it from the fridge 24 hours before baking, discard half, and feed it with equal parts flour and water.
Building the Levain (8 hours before mixing dough)
- Prepare the levain: In a separate bowl, mix 1 tablespoon of your active starter with 100g flour and 100g water. Stir until no dry flour remains. Cover and leave at room temperature for 8 hours, or until it has doubled in size and passes the float test.
Mixing the Final Dough
-
Autolyse (rest period): In a large mixing bowl, combine 1kg flour and 600g water. Mix until no dry flour remains—this will be a shaggy, rough dough. Cover and let rest for 30 minutes to 4 hours. This crucial step allows enzymes to begin breaking down starches and makes the dough easier to handle.
-
Add levain and salt: Add the entire levain to the autolysed dough. Use wet hands to pinch and squeeze the levain into the dough until well incorporated. Sprinkle the salt over the dough and add 50g water. Pinch and scrunch the salt and water through the dough until fully incorporated. The dough may feel stringy at first—keep working until it becomes smooth.
Bulk Fermentation and Folding
- First rest: Cover the dough and let rest for 15 minutes.
- Stretch and fold series: Wet your hands, grab the dough from one side, stretch it upward, and fold it over the center. Rotate the bowl 90 degrees and repeat. Continue until you’ve completed 4 folds (one full rotation). Cover and rest for 30 minutes.
- Repeat folds: Repeat the stretch and fold process two more times at 30-minute intervals (three sets total). After the final fold, cover the dough and let it rest for 2-3 hours, or until it has increased by about 30% in volume and looks bubbly.
Shaping the Loaves
- Divide the dough: Gently scrape the dough out onto a lightly floured work surface. Divide it into two equal pieces (approximately 900g each).
- Preshape: Gently fold each piece of dough onto itself to create a rough ball shape. Cover loosely and let rest for 30 minutes. The dough will spread slightly during this time—this is normal.
- Final shape: Dust two bannetons (proofing baskets) generously with flour. Working with one piece at a time, gently fold the dough edges toward the center, then roll and tighten to create a smooth, taut ball with surface tension. Place the loaf seam-side up in the banneton.
Cold Proofing (Overnight)
- Refrigerate: Cover the bannetons with plastic bags or shower caps and transfer to the refrigerator for 12-18 hours. This cold fermentation develops flavor and makes the loaves easier to handle.
Baking
- Preheat oven and Dutch oven: Place a Dutch oven or heavy lidded casserole dish in your oven and preheat to 240°C (475°F) for at least 30 minutes before baking.
- Score the loaf: Remove one loaf from the refrigerator. Cut a piece of parchment paper slightly larger than the loaf. Carefully turn the loaf out onto the parchment paper. Using a razor blade or sharp knife, score the top of the loaf with your desired pattern—a single slash down the center or a cross pattern works well.
Pro Tip: Score at a 45-degree angle, about ½ inch deep. This allows the loaf to expand properly during baking.
- Bake with steam: Carefully remove the hot Dutch oven from the oven. Lift the loaf with the parchment paper and place it in the Dutch oven. Cover with the lid and return to the oven. Bake for 20 minutes with the lid on.
- Remove lid and finish baking: Carefully remove the lid (watch for steam) and bake for an additional 20-25 minutes, until the crust is deep golden brown and the internal temperature reaches 95-98°C (203-208°F).
- Cool completely: Remove the loaf from the Dutch oven and place on a wire rack. Let cool for at least 2 hours before slicing—this crucial step allows the crumb structure to set properly.
- Repeat: Repeat steps 19-22 with the second loaf.
Recipe Info Box
|
Prep Time
|
1 hour (plus 7 days for starter creation)
|
|---|---|
| Cook Time | 40-45 minutes |
| Total Time | 7-8 days (mostly inactive fermentation time) |
| Servings | 2 large loaves (30-36 slices) |
| Difficulty Level | Advanced |
| Course | Bread, Side Dish |
| Cuisine Style | Ancient/Traditional, International |
Nutrition Information
Per serving (1 slice, approximately 50g):
|
Nutrient
|
Amount
|
% Daily Value*
|
|---|---|---|
| Calories | 171 kcal | 9% |
| Protein | 6g | 12% |
| Carbohydrates | 35g | 13% |
| Fat | 1g | 2% |
| Fiber | 1g | 4% |
| Sugar | 0.2g | – |
| Sodium | 480mg | 21% |
| Iron | 2.1mg | 12% |
| Calcium | 15mg | 2% |
Health Benefits:
- Improved digestibility due to long fermentation breaking down gluten and phytic acid
- Lower glycemic index compared to commercial yeast breads
- Enhanced nutrient bioavailability from the breakdown of anti-nutrients
- Probiotic benefits from beneficial bacteria in the fermentation process
- Natural preservation without artificial preservatives
Disclaimer: Nutrition values are estimates based on USDA data and may vary depending on specific ingredients, fermentation time, and portion sizes. These values should not be used for medical nutrition therapy.
Tips/Variations/Notes
Starter Maintenance Tips
- Feeding schedule: Once established, feed your starter once a week if stored in the refrigerator, or daily if kept at room temperature. Always discard half before feeding to maintain the proper microbial balance.
- Reviving dormant starter: If your starter has been in the refrigerator for a while, it may need 2-3 feedings at room temperature to become fully active again before baking.
- Starter consistency: Your starter should have the consistency of thick pancake batter. If it’s too thick, add more water; if too thin, add more flour.
- Signs of health: A healthy starter should be bubbly, have a pleasant yeasty-sour aroma (not unpleasantly sour or alcoholic), and double in size within 6-8 hours of feeding.
Technique Improvements
- Temperature control: Ideal fermentation temperature is 20-24°C (68-75°F). If your kitchen is cooler, fermentation will take longer; if warmer, it will happen faster.
- Hydration adjustments: This recipe uses approximately 60% hydration (water to flour ratio). For a more open crumb, increase hydration to 65-70%, but expect a stickier, more challenging dough to handle.
- Steam alternatives: If you don’t have a Dutch oven, create steam by placing a pan of water in the bottom of your oven during baking, or spray the oven walls with water during the first 10 minutes of baking.
Flavor Variations
- Whole grain blend: Substitute 20-30% of the white flour with whole wheat, rye, or spelt flour for a heartier flavor and denser crumb. Adjust water as needed—whole grains absorb more liquid.
- Herb-infused: Add 2 tablespoons of dried herbs (rosemary, thyme, oregano) during the final mixing for a fragrant savory bread.
- Seed and nut additions: After the final fold, gently fold in ½ cup of seeds (sunflower, pumpkin, sesame) or chopped nuts (walnuts, pecans) for added texture and nutrition.
Storage and Serving
- Freshness preservation: Sourdough stays fresh longer than commercial bread. Store at room temperature in a cloth bag for up to 5 days. For longer storage, freeze for up to 3 months.
- Reviving stale bread: To refresh day-old sourdough, sprinkle with water and heat in a 200°C (400°F) oven for 5-7 minutes.
- Serving suggestions: Excellent for toast, sandwiches, or served alongside soups and stews. The tangy flavor pairs particularly well with sharp cheeses, cured meats, and robust flavors.
Troubleshooting
- Dense crumb: Usually caused by under-fermentation or insufficient gluten development. Ensure your starter is fully active, allow adequate bulk fermentation time, and perform proper stretch and folds.
- Too sour: This can result from over-fermentation or a starter that’s too acidic. Try reducing bulk fermentation time or feeding your starter more frequently to maintain a better balance.
- Flat loaves: Often due to over-proofing or weak gluten structure. Make sure to shape tightly to create surface tension, and don’t let the dough proof too long before baking.
- Thick crust: This is normal for sourdough! If you prefer a thinner crust, reduce baking time slightly or brush with water before the final 10 minutes of baking.
Equipment Needed
Essential Tools
- Glass jars or plastic containers (for starter maintenance)
- Kitchen scale (essential for accurate measurements)
- Large mixing bowls (at least 4-quart capacity)
- Dutch oven or heavy lidded casserole dish (for baking)
- Bannetons (proofing baskets) or bowls lined with towels
- Bench scraper (for handling dough)
- Razor blade or bread lame (for scoring)
- Wire cooling racks
Nice-to-Have Extras
- Kitchen thermometer (for checking water and dough temperature)
- Proofing bags or shower caps (for covering dough)
- Banneton brushes (for cleaning proofing baskets)
- Dough whisk (for mixing starter)
- Spray bottle (for creating steam)
FAQs
Q: How long does it take to create a sourdough starter from scratch? A: Typically 5-7 days of daily feeding to establish a mature, active starter. However, this can vary depending on temperature, flour type, and environmental factors. Some starters may take up to 2 weeks to become fully active.
Q: Can I skip creating my own starter and buy one instead? A: Absolutely! Many reputable sources sell established sourdough starters. You can also get some from a friend who bakes sourdough. Just make sure it’s active and healthy before using.
Q: Why do I need to discard part of my starter during feeding? A: Discarding maintains the proper microbial balance and prevents the starter from becoming too acidic. It also keeps the volume manageable. Don’t worry—you can use the discard in pancakes, waffles, crackers, or other recipes.
Q: How do I know when my starter is ready to use? A: A mature starter should be bubbly, have doubled in size within 6-8 hours of feeding, and pass the “float test” (a small amount should float in water). It should also have a pleasant yeasty-sour aroma.
Q: Can I use all-purpose flour instead of bread flour? A: You can, but bread flour’s higher protein content creates better gluten structure for the characteristic open crumb. All-purpose flour will produce a softer, less chewy bread with a tighter crumb.
Q: How do I maintain my starter long-term? A: Store it in the refrigerator and feed it once a week. For longer storage (up to a month), you can freeze small portions of starter. Thaw and feed it a few times to reactivate before using.
Q: Why is my bread too sour/not sour enough? A: Sourness depends on fermentation time and temperature. Longer fermentation and warmer temperatures increase sourness. To reduce sourness, shorten fermentation time or keep the dough cooler. To increase it, extend fermentation or use warmer temperatures.
Q: Can I make this recipe gluten-free? A: Traditional sourdough relies on gluten for its structure. While gluten-free sourdough recipes exist, they require completely different ingredients and techniques and won’t produce the same result.
Q: Why do I need to score the bread before baking? A: Scoring controls where the bread expands during baking (oven spring), prevents uncontrolled tearing, and creates the distinctive “ear” pattern. Without scoring, the bread might burst unevenly.
Q: How long does homemade sourdough stay fresh? A: Properly stored sourdough stays fresh at room temperature for 4-5 days, much longer than commercial bread. The natural acidity acts as a preservative. For longer storage, freeze for up to 3 months.
Recipe Story & Cultural Context
Sourdough represents one of humanity’s oldest food traditions, with evidence dating back to 3700 BCE in Switzerland. Unlike modern commercial yeast breads, sourdough relies on wild yeasts and beneficial bacteria naturally present in flour and the environment. This ancient method of leavening bread was the primary way bread was made for thousands of years until the development of commercial yeast in the 19th century.
The science behind sourdough is fascinating. A healthy starter contains a symbiotic culture of bacteria (primarily Lactobacillus) and wild yeasts (including Saccharomyces and Candida species). These microorganisms work together: the bacteria produce lactic and acetic acids, which give sourdough its characteristic tang and act as natural preservatives, while the yeasts produce carbon dioxide that makes the bread rise.
Different regions developed their own distinctive sourdough traditions based on local flour types, climate, and cultural preferences. San Francisco became famous for its particularly sour sourdough due to its unique local microclimate and bacterial strains. In Germany, rye sourdoughs (sauerteig) became essential for making dense, flavorful rye breads that would otherwise be inedible due to rye’s complex carbohydrates.
The Gold Rush era in America (1848-1855) saw sourdough become synonymous with San Francisco. Miners carried sourdough starters with them, protecting them from freezing by sleeping with them close to their bodies. These “sourdoughs” became legendary for their ability to create bread in harsh conditions.
Today, sourdough has experienced a renaissance as people seek more traditional, healthful foods. Scientific studies have confirmed what traditional bakers have long known: sourdough fermentation improves the nutritional profile of bread, making minerals more bioavailable, reducing the glycemic response, and breaking down gluten and phytic acid that can interfere with nutrient absorption.
The art of sourdough baking represents a beautiful intersection of science and craft, where understanding microbial ecology meets the tactile pleasure of working with dough by hand. Each loaf tells the story of its environment, the flour used, and the baker’s touch—no two sourdough loaves are exactly alike, making each one a unique creation.
Pairing Suggestions
Classic Pairings
- Cheese board: Serve with aged cheeses like cheddar, gouda, or parmesan. The tangy sourdough complements sharp cheeses beautifully.
- Soups and stews: Perfect for dipping into hearty soups like minestrone, beef stew, or potato leek soup.
- Bruschetta: Toast slices and top with diced tomatoes, garlic, and fresh basil for a classic Italian appetizer.
- Avocado toast: The sturdy structure and tangy flavor make sourdough ideal for avocado toast, topped with eggs, radishes, or microgreens.
Beverage Pairings
- Wine: A crisp white wine like Sauvignon Blanc or a light red like Pinot Noir
- Beer: Craft beers, especially IPAs or farmhouse ales, complement sourdough’s complex flavors
- Coffee: A strong espresso or pour-over coffee for breakfast
- Tea: Black teas like Earl Grey or English Breakfast work well with toast
Seasonal Adaptations
- Spring: Serve with fresh peas, mint, and ricotta spread
- Summer: Perfect for caprese sandwiches with fresh tomatoes, mozzarella, and basil
- Autumn: Pair with roasted pumpkin soup or mushroom bruschetta
- Winter: Excellent for making stuffing or serving alongside beef stew
Special Occasion Ideas
- Thanksgiving: Use sourdough for homemade stuffing or dressing
- Dinner parties: Serve as part of an artisan bread basket with flavored butters
- Brunch: Make French toast or bread pudding with day-old sourdough
- Gift giving: Give a loaf of homemade sourdough along with a jar of your starter as a thoughtful gift
Conclusion
Mastering sourdough baking is more than just learning a recipe—it’s connecting with thousands of years of human history, understanding the science of fermentation, and developing a rewarding craft that yields results far superior to commercial bread. This ancient method of bread making represents the perfect marriage of simplicity and complexity, requiring just four basic ingredients but demanding patience, observation, and skill.
What makes this sourdough recipe special is its foundation in traditional techniques while providing clear, accessible instructions for modern home bakers. The long fermentation process not only develops incredible flavor complexity but also creates a more digestible, nutritious bread that’s easier on your system than commercial yeast breads.
Whether you’re drawn to sourdough for its health benefits, its connection to tradition, or simply the unmatched flavor and texture, this recipe will guide you through each step of the journey. From creating and maintaining your starter to shaping and baking beautiful loaves, you’ll develop skills that will serve you for a lifetime.
We’d love to hear about your sourdough adventures! Please leave a comment below sharing your experience, any variations you tried, or questions you might have. Don’t forget to rate the recipe and share photos of your beautiful creations on social media using the hashtags below.
Remember, sourdough is as much about the journey as the destination. Each loaf teaches you something new, and no two bakes are exactly alike. Embrace the process, learn from each batch, and enjoy the incredible satisfaction of creating bread using nature’s oldest leavening method.
Happy baking, and may your kitchen be filled with the irresistible aroma of freshly baked sourdough!