
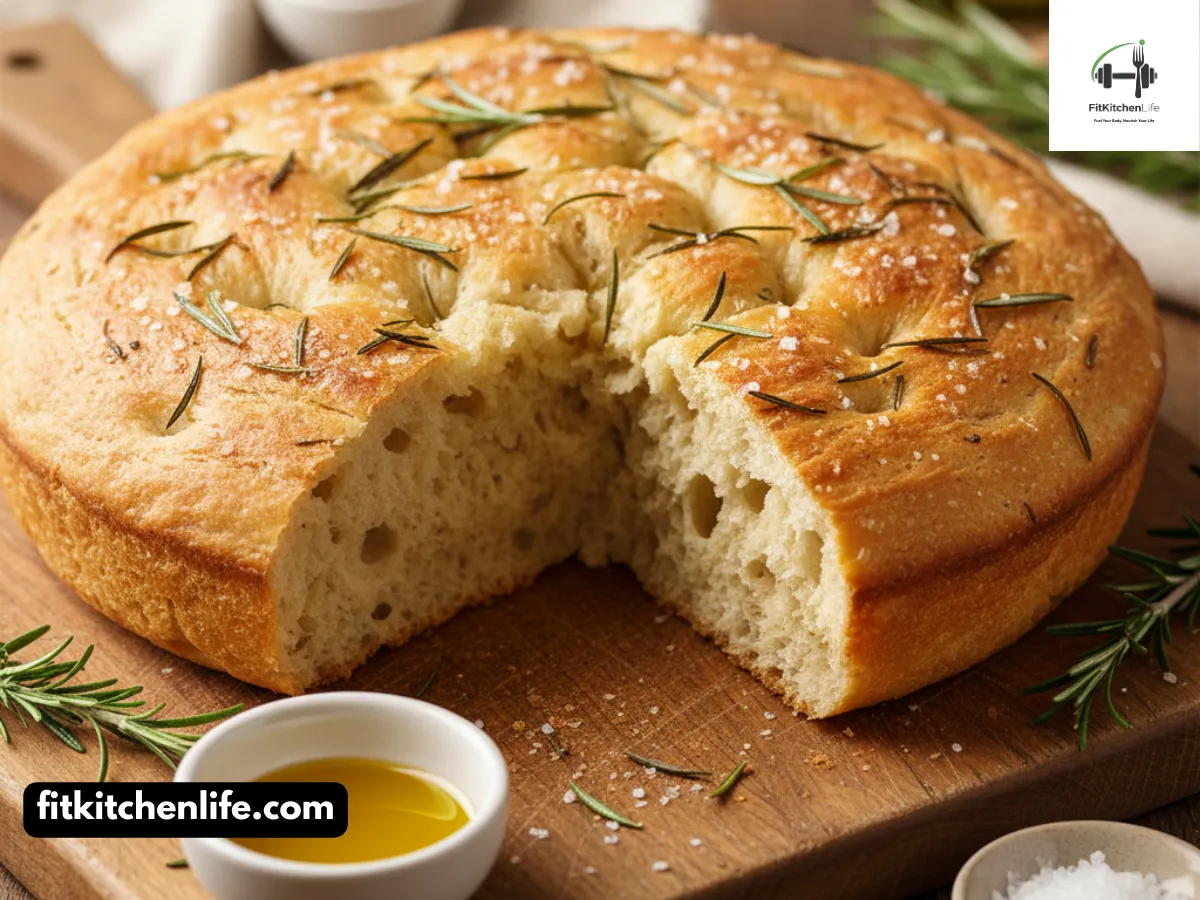
Imagine pulling a golden-brown flatbread from the oven, the surface dimpled and glistening with olive oil, the aroma of fresh rosemary filling your kitchen. This is focaccia—Italy’s beloved flatbread that bridges the gap between bread and pizza, offering the perfect balance of crisp exterior and tender, airy interior. Dating back to ancient Etruscan and Greek civilizations, focaccia has been a staple of Italian cuisine for centuries, evolving from simple flatbread to the versatile, flavorful masterpiece we know today.
What makes this focaccia recipe special is its commitment to authentic Italian techniques while being accessible for home bakers. We use a high-hydration dough that creates those signature bubbles and pockets, combined with proper folding techniques that develop strength without compromising tenderness. The result is a focaccia with a shatteringly crisp bottom, a golden dimpled top, and an interior that’s light, airy, and perfect for soaking up olive oil.
Picture tearing into a warm piece, the sound of the crisp crust giving way to reveal the soft, hole-filled interior. This isn’t just bread—it’s a canvas for culinary creativity, perfect as an appetizer, sandwich base, or accompaniment to any meal. Whether you’re a complete beginner or an experienced baker looking to perfect your focaccia technique, this recipe will guide you through each step with clear instructions and professional tips.
Table of Contents
ToggleIngredients
For the Focaccia Dough
- 500g strong white bread flour (approximately 4 cups), plus extra for dusting
- 7g (2¼ teaspoons) instant yeast or active dry yeast
- 2 teaspoons (12g) fine sea salt
- 5 tablespoons (75ml) extra virgin olive oil, plus more for the pan and finishing
- 350-400ml (1½ cups) lukewarm water
- 1 teaspoon (5g) granulated sugar (optional, helps activate yeast)
For Topping
- 2 tablespoons (30ml) extra virgin olive oil
- 1 tablespoon (15ml) water
- 1 teaspoon flaky sea salt
- ¼ cup fresh rosemary sprigs
- Additional toppings as desired (see variations)
Yield: 1 large focaccia (25 x 35cm / 9 x 13 inches) Serving Size: 1 piece (approximately 57g) Servings: 12-15 pieces
Ingredient Notes & Substitutions
- Flour Selection: Strong bread flour (12-14% protein) provides the structure needed for high-hydration dough. All-purpose flour can be used, but the texture will be slightly less chewy.
- Olive Oil: Use high-quality extra virgin olive oil for the best flavor. This is not the place to cut corners—good olive oil makes a significant difference.
- Water Temperature: Lukewarm water (around 37°C/98°F) activates yeast without killing it. Too hot water will kill the yeast; too cold will slow activation.
- Yeast Options: Instant yeast is preferred, but active dry yeast can be used—just dissolve it in the water first.
- Salt: Fine sea salt dissolves evenly in the dough, while flaky sea salt provides texture and flavor on top.
Cost Estimate: $2-3 for all ingredients, making the entire focaccia approximately $2-3.
Instructions/Steps
Mixing the Dough
-
Combine dry ingredients: In a large mixing bowl, whisk together the flour and instant yeast until well combined. This ensures even distribution of yeast throughout the flour.
Pro Tip: If using active dry yeast, dissolve it in the lukewarm water with the sugar (if using) and let sit for 5 minutes until frothy before adding to the flour.
-
Add salt and water: Add the fine sea salt to one side of the bowl and the lukewarm water to the other side. This initial separation prevents the salt from directly contacting and inhibiting the yeast.
-
Mix initial dough: Using your hands or a dough scraper, mix the ingredients until they come together into a shaggy, rough dough. The dough will be quite sticky—this is normal and necessary for the final texture.
Kneading and First Rise
-
Knead the dough: Turn the dough out onto a lightly floured surface. Knead for 5-10 minutes until the dough becomes smooth and elastic but still slightly sticky. Avoid adding too much flour—this dough should remain relatively wet.
Pro Tip: Use the “slap and fold” technique for wet doughs: lift the dough, slap it down on the work surface, then fold it over itself. Repeat this motion for 5-10 minutes.
-
First fermentation: Place the dough in a lightly oiled bowl, cover with plastic wrap or a damp kitchen towel, and let rise in a warm, draft-free place for 1 hour, or until doubled in size.
Folding and Second Rise
-
First fold: After the first rise, gently deflate the dough and fold it by stretching one side up and over the center, then rotating the bowl 90 degrees and repeating. Do this for all four sides. This builds strength in the dough.
Pro Tip: Wet your hands to prevent sticking when handling this high-hydration dough.
-
Second rise: Cover the bowl again and let rise for another 30 minutes.
-
Second fold: Repeat the folding process one more time, then cover and let rise for an additional 30 minutes. These folds develop the gluten structure needed to support the high hydration and create those signature bubbles.
Shaping and Final Proof
-
Prepare the pan: Generously oil a 25 x 35cm (9 x 13 inch) rimmed baking sheet or rectangular pan with 2 tablespoons of olive oil. Make sure the oil covers the entire surface, including the sides.
-
Shape the focaccia: Gently turn the dough out onto the prepared pan. Using your fingertips, gently stretch and press the dough to fill the pan. Don’t worry if it doesn’t reach the edges immediately—let it rest for 5 minutes, then gently stretch again.
Pro Tip: Be gentle during shaping to preserve the air bubbles you’ve worked so hard to create. The dough should be handled minimally to maintain its airy structure.
-
Final proof: Cover the pan with plastic wrap or a damp kitchen towel and let rise in a warm place for 35-45 minutes, or until the dough has noticeably puffed up.
Dimpling and Topping
-
Preheat oven: About 20 minutes before baking, preheat your oven to 220°C (425°F).
-
Create dimples: Using your fingertips, gently press dimples all over the surface of the dough. Don’t press too hard—you want to create indentations, not deflate the dough completely.
Pro Tip: Keep your fingers well-oiled to prevent sticking and to create those signature shiny dimples.
-
Prepare topping mixture: In a small bowl, whisk together 2 tablespoons olive oil, 1 tablespoon water, and 1 teaspoon flaky sea salt until well combined.
-
Add toppings: Drizzle the olive oil mixture evenly over the focaccia, making sure to get it into the dimples. Push fresh rosemary sprigs into some of the dimples.
Baking
-
Bake: Place the pan in the preheated oven and bake for 20 minutes, or until golden brown and crisp. The focaccia should sound hollow when tapped on the bottom.
Pro Tip: For extra crispiness, you can remove the focaccia from the pan for the last 2-3 minutes of baking and place it directly on the oven rack.
-
Finish with olive oil: While the focaccia is still hot, drizzle with an additional 1-2 tablespoons of extra virgin olive oil. This final drizzle adds flavor and keeps the crust crisp.
-
Cool and serve: Let the focaccia cool in the pan for 5 minutes, then transfer to a wire rack. Cut into squares or rectangles and serve warm or at room temperature.
Recipe Info Box
|
Prep Time
|
25 minutes
|
|---|---|
| Cook Time | 20 minutes |
| Total Time | 2-3 hours (including rising time) |
| Servings | 1 large focaccia (12-15 pieces) |
| Difficulty Level | Easy |
| Course | Bread, Appetizer, Side Dish |
| Cuisine Style | Italian, Mediterranean |
Nutrition Information
Per serving (1 piece, approximately 57g):
|
Nutrient
|
Amount
|
% Daily Value*
|
|---|---|---|
| Calories | 142 kcal | 7% |
| Protein | 5g | 10% |
| Carbohydrates | 20.4g | 7% |
| Fat | 4.5g | 7% |
| Fiber | 1g | 4% |
| Sugar | 1g | – |
| Sodium | 320mg | 14% |
| Monounsaturated Fat | 3.32g | – |
| Calcium | 20mg | 2% |
| Folate | 78.7mcg | 20% |
| Phosphorus | 73mg | 10% |
| Potassium | 65mg | 2% |
Health Benefits:
- Heart-healthy fats from extra virgin olive oil, rich in monounsaturated fats
- Moderate protein content for muscle maintenance and satiety
- B vitamins from enriched flour, supporting energy metabolism
- Versatile base that can be adapted with various healthy toppings
- Lower sodium option compared to many commercial breads when homemade
Disclaimer: Nutrition values are estimates based on USDA data and may vary depending on specific ingredients, portion sizes, and toppings. These values should not be used for medical nutrition therapy.
Tips/Variations/Notes
Technique Improvements
- Temperature control: Ideal dough temperature during mixing is 24-26°C (75-80°F). If your kitchen is warm, reduce the water temperature slightly; if cool, use slightly warmer water.
- Hydration adjustments: This recipe uses about 70-80% hydration (water to flour ratio). In humid weather, you may need slightly less water; in dry conditions, slightly more.
- Cold fermentation: For even better flavor development, after the first fold, refrigerate the dough for 24 hours, then proceed with shaping and final proof at room temperature.
- Steam alternative: For an extra-crispy crust, place a pan of water in the bottom of the oven during baking to create steam.
Flavor Variations
- Focaccia Genovese: The classic version from Genoa includes only olive oil, salt, and rosemary. Keep it simple to appreciate the perfect balance of flavors.
- Focaccia Barese: Add cherry tomato halves, pitted olives, and oregano before baking. This Puglian variation is heartier and perfect as a meal.
- Garlic herb focaccia: Mix 2 minced garlic cloves into the olive oil topping and add 1 tablespoon each of dried oregano and thyme.
- Caramelized onion focaccia: Top with thinly sliced caramelized onions and fresh thyme before baking.
Topping Ideas
- Vegetable toppings: Thinly sliced potatoes, bell peppers, zucchini, or red onions work well. Pat vegetables dry before adding to prevent soggy focaccia.
- Cheese variations: Crumbled feta, grated Parmesan, or torn mozzarella can be added during the last 5 minutes of baking.
- Sweet versions: For dessert focaccia, top with grapes, figs, or thinly sliced apples, sprinkle with sugar, and finish with honey after baking.
- Nut toppings: Toasted pine nuts, slivered almonds, or chopped walnuts add crunch and flavor.
Storage and Serving
- Freshness preservation: Focaccia is best eaten the day it’s made. Store at room temperature in a paper bag for up to 2 days.
- Reviving stale focaccia: Refresh day-old focaccia by sprinkling with water and heating in a 200°C (400°F) oven for 5-7 minutes.
- Serving suggestions: Perfect as an appetizer with olive oil for dipping, as a sandwich bread for panini, or alongside soups and salads. Also excellent for making croutons or breadcrumbs when stale.
Troubleshooting
- Dense, heavy focaccia: Usually caused by under-kneading or insufficient rising. Make sure to complete the folding steps and allow adequate proofing time.
- Soggy bottom: This indicates the pan wasn’t oiled enough or the focaccia was under-baked. Ensure generous oiling and bake until deep golden brown.
- Not enough bubbles: The dough may have been handled too roughly or the hydration too low. Be gentle during shaping and ensure proper water measurement.
- Too salty: This can happen if too much topping salt was used. Remember that flaky sea salt is saltier than fine salt, so use it sparingly.
Equipment Needed
Essential Tools
- Large mixing bowl (at least 4-quart capacity)
- Rimmed baking sheet (25 x 35cm / 9 x 13 inches)
- Kitchen scale (for accurate measurements)
- Dough scraper (for handling wet dough)
- Pastry brush (for oiling the pan)
- Measuring spoons and cups
- Plastic wrap or damp kitchen towels
Nice-to-Have Extras
- Stand mixer with dough hook attachment (optional but helpful)
- Kitchen thermometer (for checking water temperature)
- Bench scraper (for dividing and handling dough)
- Instant-read thermometer (for checking doneness)
- Pizza stone or baking steel (for extra-crispy bottom)
FAQs
Q: Can I make focaccia without a stand mixer? A: Absolutely! This recipe is designed to be made by hand. The “slap and fold” technique works perfectly for developing the gluten structure without any special equipment.
Q: Why is my focaccia not getting bubbles? A: Bubbles come from proper gluten development and adequate fermentation. Make sure to complete the folding steps and allow enough rising time. Also, be gentle when shaping to preserve the air bubbles you’ve created.
Q: Can I use all-purpose flour instead of bread flour? A: Yes, but the texture will be slightly different. Bread flour has higher protein content, which creates better structure for the high-hydration dough. All-purpose flour will produce a softer, more tender focaccia.
Q: How do I know when the focaccia is done baking? A: Look for a deep golden brown color, and the focaccia should sound hollow when tapped on the bottom. An instant-read thermometer inserted into the center should read 93-96°C (200-205°F).
Q: Can I make the dough ahead of time? A: Yes! After the first fold, you can refrigerate the dough for up to 24 hours. This actually improves the flavor. Let it come to room temperature before shaping and final proofing.
Q: Why do we dimple the focaccia? A: Dimpling serves two purposes: it creates pockets for the olive oil to pool, creating flavor, and it prevents the dough from rising too much during baking, maintaining the characteristic flatbread shape.
Q: Can I freeze focaccia? A: Yes, freeze baked focaccia for up to 3 months. Thaw at room temperature, then refresh in a 200°C (400°F) oven for 5-7 minutes to restore crispness.
Q: What’s the difference between focaccia and pizza dough? A: Focaccia dough is typically wetter (higher hydration) and contains more olive oil than pizza dough. Focaccia is also baked in a pan rather than directly on a pizza stone or oven rack.
Q: Can I make this recipe gluten-free? A: Traditional focaccia relies heavily on gluten for its structure. While gluten-free versions exist, they require completely different ingredients and techniques and won’t produce the same result.
Q: How long does homemade focaccia stay fresh? A: Focaccia is best eaten within 1-2 days of baking. Store at room temperature in a paper bag—plastic will make it soggy. Refresh in the oven if it becomes stale.
Recipe Story & Cultural Context
Focaccia represents one of Italy’s most ancient and beloved bread traditions, with roots stretching back to the Etruscans of North Central Italy and Ancient Greece. The word “focaccia” derives from the Latin “focus,” meaning hearth, as these flatbreads were traditionally baked in the ashes of the hearth fire.
Historically, focaccia was more than just bread—it was a way of life. In ancient Rome, flatbreads were baked on hot stones and seasoned with olive oil, herbs, and salt. These early versions were simpler than what we know today but established the foundation for focaccia’s development.
As focaccia evolved, different regions of Italy developed their own distinctive styles. Focaccia Genovese, from the Liguria region, is perhaps the most famous variety—characterized by its dimpled surface, generous olive oil, and minimal toppings of rosemary and salt. This version became so iconic that Genoa claims to be the true birthplace of focaccia as we know it today.
In southern Italy, particularly in Puglia, Focaccia Barese emerged as a heartier variation. Made with durum wheat flour and often topped with tomatoes, olives, and potatoes, this version reflects the agricultural abundance of the region and serves more as a meal than an accompaniment.
The cultural significance of focaccia extends beyond mere sustenance. In Liguria, focaccia was traditionally eaten for breakfast, dipped in warm cappuccino—a practice that might seem unusual to non-Italians but makes perfect sense when you understand the region’s deep connection to olive oil and bread.
Focaccia also played a role in religious and seasonal celebrations. In some parts of Italy, special focaccia was baked for All Saints Day, while in other regions, specific shapes and decorations marked various holidays and festivals throughout the year.
The beauty of focaccia lies in its simplicity and versatility. Made with just a few basic ingredients—flour, water, yeast, salt, and olive oil—it showcases the quality of its components. The olive oil, in particular, is crucial. In Italy, the type and quality of olive oil used can make or break a focaccia, with many bakers having strong preferences for specific regional oils.
Today, focaccia has gained popularity worldwide, appreciated for its perfect balance of crisp exterior and tender, airy interior. It serves as a blank canvas for culinary creativity, adapting to various tastes while maintaining its essential Italian character. Whether enjoyed plain, topped with herbs, or loaded with vegetables and cheese, focaccia remains a testament to the beauty of traditional Italian baking.
Pairing Suggestions
Classic Italian Pairings
- Antipasto: Serve alongside cured meats, cheeses, olives, and marinated vegetables as part of a traditional antipasto platter
- Soup accompaniment: Perfect for dipping into minestrone, ribollita, or other hearty Italian soups
- Sandwich base: Use for panini with mozzarella, tomatoes, and fresh basil
- Breakfast: Traditional in Liguria, dipped in warm cappuccino
Beverage Pairings
- Wine: A crisp Italian white wine like Pinot Grigio or Vermentino
- Beer: A light Italian lager or pilsner
- Non-alcoholic: Sparkling water with lemon, or Italian sodas
- Coffee: In the Ligurian tradition, with cappuccino for breakfast
Seasonal Adaptations
- Spring: Top with asparagus, peas, and fresh mint
- Summer: Perfect with ripe tomatoes, basil, and fresh mozzarella
- Autumn: Excellent with roasted grapes, walnuts, and rosemary
- Winter: Pair with caramelized onions, sage, and Parmesan
Special Occasion Ideas
- Parties: Cut into small squares and serve as appetizers with various toppings
- Picnics: Travels well and serves as a base for portable sandwiches
- Holiday gatherings: Make festive shapes and top with seasonal ingredients
- Casual dinners: Serve as bread to accompany pasta dishes or grilled meats
Conclusion
Mastering the art of focaccia making is a journey into the heart of Italian baking tradition. This ancient flatbread represents the perfect marriage of simplicity and sophistication, requiring just a few basic ingredients but demanding proper technique to achieve those signature bubbles and crisp texture.
What makes this focaccia recipe special is its foundation in authentic Italian methods while being accessible for bakers of all skill levels. The high-hydration dough creates the characteristic airy crumb, while the folding technique develops strength without compromising tenderness. The generous use of quality olive oil not only adds flavor but also creates that irresistible crisp exterior.
Whether you’re drawn to focaccia for its versatility as an appetizer, sandwich base, or accompaniment to meals, or simply for the satisfaction of creating beautiful, bubbly bread, this recipe will guide you through each step with clear instructions and professional tips.
We’d love to hear about your focaccia baking adventures! Please leave a comment below sharing your experience, any variations you tried, or questions you might have. Don’t forget to rate the recipe and share photos of your beautiful creations on social media using the hashtags below.
Remember, focaccia is as much about the journey as the destination. Each batch teaches you something new about dough development, ingredient temperatures, and the delicate balance that creates this extraordinary flatbread. Embrace the process, experiment with toppings, and enjoy the incredible satisfaction of creating authentic Italian focaccia in your own kitchen.
Happy baking, and may your kitchen be filled with the irresistible aroma of freshly baked focaccia!